 Toys Testing Equipment
 Footwear Testing Equipment
 Tensile Testing Machine
 Environmental Test Chamber
 Building Material Flammability Test Equipment
 Paper Testing Equipment
 Spectacle Frames Testing Equipment
 Oil Analysis Testing Equipment
 Lab Test Equipment
 Electronic Testing Equipment
 Stationery Testing Equipment
 Flammability Test Equipment
 Furniture Testing Machine
 Textile Testing Equipment
 How to evaluate the corrosion resistance of lubricating grease?
 - 2026/1/2
- How to evaluate the corrosion resistance of lubricating grease? A comprehensive guide to lubricating grease corrosion resistance testing and professional testing equipment. A tiny corrosion spot in...
 The Hong Kong fire once again rings the alarm: How can laboratories build a safety defense line for building materials through combustion tests?
- 2025/12/25
- The Hong Kong fire once again rings the alarm: How can laboratories build a safety defense line for building materials through combustion tests? The recent serious fire accident in Hong Kong has s...
 The Indian furniture inspection market welcomes new regulations!
- 2025/11/28
- The Indian furniture inspection market welcomes new regulations! The demand for these testing instruments will soar in 2026. New regulations in India are about to come into effect, and furniture insp...
- More>
SATRA TM21 Detection Method

1. Principle
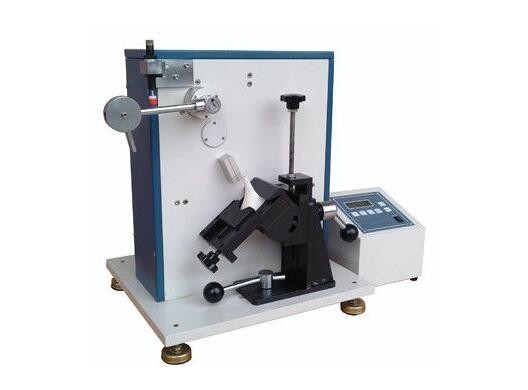
A heel is secured around its seat. Then blows of fixed strength are applied repeatedly to the tip in a direction of forward. It stops when failure occurs. It is required to record the number of blows to cause failure and the type of failure.
2. Procedure
2.1 Place a tray with a secured test specimen in the pendulum fatiguetester, while the back of the heel faces the pendulum. Then fix it to the clamp assembly.
2.2 determine the alignment of the heel reinforcement as follows:
2.2.1 If a reinforcing tension pin is contained in the test specimen heel, insert into it the rod with diameter similar to the internal diameter of the tension pin.
2.2.2 If a reinforcing solid rod is contained in the test specimen, partly withdraw the rod from a prepared spare test specimen.
2.3 Adjust the clamp assembly by operating it horizontally and vertically, then by rotating it around its horizontal axis. Through above steps, the rod inserted or the withdraw rod is conformed close to and parallel to line AB.
2.4 Holding the rod and the line AB parallel, and adjust the position of the heel tip to align with line CD. The rear of the heel tip aligns with the intersection of lines AB and CD. Tighten all clamps firmly as soon as the correct position is achieved.
2.5 Set the cut-off device of the tester and set the counter to zero.
2.6 Control the required test end point and check intervals.
2.7 Operate the machine until the test end point has been reached, or until failure occurs due to damage severe enough stimulate the cut-off device. It is best to run the machine throughout the test, apart from short pauses for checking the test specimen, because breaks in testing may affect the heat increasing in the heel by repeated impacts and affect the test result.
2.8 Inspect the test specimen at the chosen intervals and record the type and degree of any damage which has occurred. The principal types of damage are:
①Cracking of the plastic 20-40mm from the heel tip, well away from the impact point. The point may gradually become worse until there is a clean break .
② Cracking running along the heel.
③ The tension pin or reinforcing rod breaking through the heal breast.
④ Damage at the impact points.
2.9 Note the numbers of impacts conforming to the two checking stages between which damage first occurred, and record the type of damage.
2.10 Note the number of impacts at final failure together with the type of damage, or a condition that no damage occurs at the end of the test.
2.11 Repeat the procedure with the remaining test specimen.
If you have any demand for SATRA TM21 testing equipment,please let me know.
More details refer to http://www.lab-testequipment.com/Heel-Fatigue-Tester.html
- ·New type Crockmeter- Manual Is Newly Released!
- ·Chinese New Year's Holiday!
- ·Skyline Instruments to SASO Installing and Training with a perfect Ending
- ·2014 New Design Toys 2m/s. Dynamic Strength Tester
- ·In 2014, the latest launched Caster and Chair Base Durability Tester
- ·The Blockbuster Launched Chair Stability Tester

 Toys Testing Equipment
 Footwear Testing Equipment
 Tensile Testing Machine
 Environmental Test Chamber
 Building Material Flammability Test Equipment
 Paper Testing Equipment
 Spectacle Frames Testing Equipment
 Oil Analysis Testing Equipment
 Lab Test Equipment
 Electronic Testing Equipment
 Stationery Testing Equipment
 Flammability Test Equipment
 Furniture Testing Machine
 Textile Testing Equipment

 English
 中文
中文 Español
 française
 العربية
 Русский


